DIY Guide to Restoring Leaky Glass Aquariums
Harper Kelly
Featured Gallery
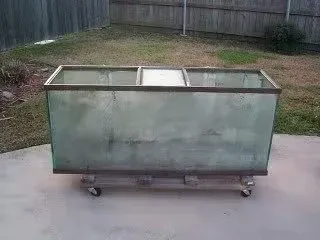
I transformed this old aquarium into one that looked brand-new. This guide will show you how to reseal a glass tank with detailed, step-by-step instructions.
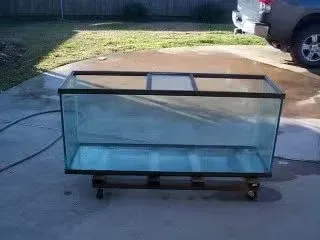
After
Give an Old Fish Tank a Fresh Start
For aquarium hobbyists, the ability to restore an all-glass tank is a valuable skill. Perhaps you've discovered an old aquarium in a relative's garage or attic, or stumbled upon a bargain at a yard sale or on Craigslist. If you're like me, you've encountered such finds. With some effort, these old tanks can be made watertight and look new again.
Resealing for Safety
Beyond making an old tank look new, resealing also ensures that no harmful substances remain that could leach into the water and harm fish. Aquariums previously used for reptiles or cleaned with soap and other inappropriate products should always be resealed. It's a wise precaution whenever the tank's history is uncertain.
What This Article Covers
- Inspecting the Aquarium
- Tools and Materials
- Preparing the Tank
- Removing Old Silicone
- Applying New Silicone
- Handling the Frame
- Curing and Final Cleaning
Resealing your old glass aquarium is easier than you might think.
Image created with Canva
Inspecting the Aquarium
Check the glass for chips or cracks. Small chips that don't exceed the thickness of the adjacent glass are not a problem. Tanks with few or none of these small chips are the best candidates for refurbishment.
Larger chips that go beyond the thickness of the adjoining glass may cause issues, potentially leading to a stress fracture when the tank is filled. It's best to replace such panes with new glass.
While this article doesn't cover replacing broken glass, it is possible to salvage aquariums with one or more broken panes. That's a topic for another article, though. Refurbishing aquariums with broken glass should not be attempted by a novice.
Inspect the frame for cracks and its adhesion to the glass. The frame's condition will determine if it needs to be removed or replaced. If the frame is loose, it can be removed and set aside to be reattached later. Don't try to pry it off if it doesn't detach easily.
Do You Need to Remove the Silicone Between the Panes?
A common misconception about refurbishing all-glass aquariums is that all silicone sealant must be removed from between the glass panes. This is not necessary and strongly discouraged. Only loose pieces of silicone between the glass should be removed if they exist. Most of the time, the silicone bond will still be intact between the glass panes.
The silicone that needs to be removed is on the inside of the aquarium. Some silicone on the outside of the glass may have to be removed if the frame needs to be repaired, replaced, or reattached.
Featured Gallery

Single edge razor blade

5-in-1 painter’s tool
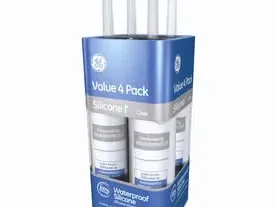
GE Silcone I 100% silicone 4 pack

Scraper – single edge razor blade holder

Box cutter

Distilled white vinegar
Tools and Materials
Several tools and supplies are necessary for refurbishing an all-glass aquarium.
Tools
- Single edge razor blades
- Scraper
- Box cutter
- 5-in-1 painter's tool
- Spray bottle
Supplies
- Distilled white vinegar
- Paper towels
- Clean rags
- 100% silicone
Important
Only use 100% silicone to reseal all glass aquariums. For example, use GE Silicone I, not GE Silicone II. Some types have mildew resistance chemicals added that will leach back into the aquarium when filled. Do not use any other kind of sealant or caulk as the result will be disastrous.
Preparing the Tank
- A good start to preparing the all-glass aquarium to be refurbished is to hose it out really well with clean water. Make sure that the work area is clear of any rocks, pebbles, and other debris.
- Set the aquarium on one of the sides, so that the water can easily flow out. Do not fill the aquarium with water then attempt to dump it out. Water is extremely heavy, and while aquariums can contain it any flexing can crack the glass and possibly injure you.
- Once the aquarium is hosed out, set it upright and pour a little distilled white vinegar into it. Use one of the clean rags to clean the glass and frame with the vinegar. Distilled white vinegar is acidic and breaks down hard water stains and other dirt off the glass.
- Rinse the rag with clean water then add a little more vinegar to the aquarium. With some effort, the aquarium should be sparkling clean.
Distilled white vinegar is used to clean the aquarium since it's easy to tell when there is no residue left (the smell is gone), and it works really well. Any residue dilutes to non-toxic levels when the aquarium is filled as well.
Choose a Soft Work Surface
In order to not damage the glass of the aquarium, it is best to have a clean, soft work surface. A sturdy table with a piece of carpet on top works well. The carpet allows the aquarium to be easily moved and protects it as well.
Removing Old Silicone
- Fill the spray bottle with half distilled white vinegar, and half clean water then set it aside.
- The 5-in-1 painter's tool makes removing the bulk of the old silicone very easy. Use the pointed edge in the corners to scrape out the old silicone. Don't worry about getting the film that is left behind. The single edge razor blades and spray bottle will be used to get that. Use the box cutter to cut the silicone pieces loose from the aquarium then discard them. Be sure not to force the edge of the tool between the glass as chipping may occur.
- If the aquarium frame has been removed, scrape the silicone from the aquarium that held it in place. Be careful to hold the tool flat against the glass and not on an angle when close to the edge. The tool can easily chip the edge of the glass. Scrape any silicone off of the aquarium frame as well.
- Once the bulk of the silicone is removed, switch to the scraper with the single edge razor blade in it. If the area of the aquarium you're working on is dry, use the spray bottle to dampen it. This makes it easier to find residual silicone and remove it with the razor blade.
- Keep working until there is no more silicone residue. This is very important as new silicone will NOT bond to old cured silicone.
- Once all of the silicone is removed, wipe the aquarium inside and out with a clean rag dampened with distilled white vinegar. It is most likely that you'll discover some more silicone residue. Repeat the process until there's none left.
- Wipe the tank out with a clean rag and water. Rinse the rag as needed and continue wiping out the aquarium until there is no hint of the vinegar smell. Allow the aquarium to dry for a few days.
Applying New Silicone
Resealing an aquarium requires patience and finesse; otherwise, the result will be less than desired. There are different techniques for resealing an aquarium. Some people choose to mask each pane with a rectangle of masking tape 1/2″ from the adjoining pane. The tape is removed after the silicone is allowed to cure for a short amount of time. Some of the best resealers choose to apply the silicone freehand. Either way, here are a few tips to help with the process.
- Keep plenty of paper towels handy to wipe excess silicone from your finger.
- Use one continuous to spread the silicone, and do not go over it again.
- Use a bead appropriate to the aquarium size, but not more than 1/4″.
Step-by-Step Instructions
- Set the aquarium in such a way that all the seams are easily accessible from a comfortable position. Resealing can be hard on the back if you have to bend over to reach into the aquarium.
- Mask the seal areas of the tank if desired.
- Place the silicone in the caulking gun, cut the tip on a slight angle slightly less than 1/4″, then puncture the silicone cartridge if necessary.
- Run a bead of silicone around the bottom inside seams of the aquarium. Smooth each in one motion toward a corner. If you must, stop the motion, then reposition and restart the motion in the same place.
- Be sure to wipe excess from your finger with the paper towels. This will help prevent getting silicone where it doesn't belong.
- Run a bead in one corner from the bottom to about one to two inches from the top of the aquarium. Pull the silicone up to the top of the aquarium while smoothing. The space left empty at the top should be covered by the excess silicone. Add a little if needed. Repeat in the other three corners.
- If you've masked the seal area, allow the silicone to cure for a few hours, then remove the tape by pulling it slowly on an angle away from the seal. This should leave a clean, professional-looking line.
Handling the Frame
If the top frame was removed, run a bead along the top of the glass then press the frame down on to the aquarium. Use masking tape to secure the frame down by placing a piece over the frame from one side of the glass to the other. Check for excess and smooth it along the frame.
If the top frame was not removed or if it was just reattached, run a bead along the underside of the frame, then smooth it.
If the aquarium has a glass brace, run a bead under it where it joins the side adjoining glass, then smooth it.
Don't attempt to install the bottom frame now if it has been removed. It should be reattached after the aquarium seal has cured for 24 hours. Don't move the aquarium until this time has passed, either. Reattach the bottom frame by running a bead along the bottom glass edge, then reinstall the frame. The excess will press into the frame. Use masking tape pieces to secure the frame until it cures.
Curing and Cleaning Up
Allow the aquarium to cure for a minimum of five days, preferably seven, before test-filling it. Test filling should be done outside if possible, just in case your reseal didn't go so well. Make sure the aquarium is on a level surface and preferably on an aquarium stand. Fill 1/4 of the way and wait thirty minutes before filling to halfway. Wait another thirty minutes, then fill the remaining half.
The greatest pressure is at the bottom of the aquarium, which is why it is suggested to take longer to fill the first half. Use a razor blade to clean any stray silicone from the glass.
If all goes well, drain the aquarium, rinse it out a few times to be sure any residual vinegar is gone, then set it up in its location.
Questions & Answers
Question: Wondering if you have advice for someone trying to actually remove one of the glass panels? I got a couple of 40 gallon zilla tanks im trying to repurpose into terrariums and i need to remove the front panel to make it into glass doors instead!
Answer: You can remove the silicone around the pane then use a razor blade to get between the glass. Applying very slight pressure while doing that will allow you to get in between the glass. VERY gently cut through the seal. Do not allow the glass to crimp down on the razor blade as cracking can happen.
Question: How can you get the white residue off of the top an aquarium?
Answer: Distilled white vinegar will work most of the time.
© 2010 Nolapete
Sources
- DIY Guide to Restoring Leaky Glass Aquariums — pethelpful